
WordPress Help Manual
WordPress is an Open-Source software system used by millions of people around the world to create beautiful websites and blogs. It is completely customisable by the use of themes and plugins.
SVECW website is built using ‘Hello Elementor’ theme and ‘Elementor’ page builder. Apart from Elementor, the below listed plugins are used for efficient working of the website.
Admin and Site Enhancements (ASE): This plugin helps in easily enhancing various admin workflows and site aspects while replacing multiple plugins doing it.
Advanced Access Manager: This plugin is used to assign access and permissions for various users of the website, that is, webmasters from each department.
All-in-One WP Migration: This is used to back-up the site regularly and helps in migration of the website.
Code Snippets: This plugin is used to insert custom code snippets into the files without altering or editing the php files directly.
Presto Player: This is a media player used to play videos on the website, especially the home page campus tour video.
PublishPress Capabilities: This plugin assists to assign access and permissions for various users of the website, for e.g., Webmasters from each department.
PublishPress Permissions: This plugin assists to assign access and permissions for various users of the website, for e.g., Webmasters from each department.
Secure Custom Fields: This is used to insert custom dynamic fields into the blog posts, faculty pages and department pages.
Simple Custom Post Order: This is used to edit the order of the posts, specifically for faculty lists, by drag and drop feature.
TablePress: This is used to create and embed beautiful and interactive tables into your WordPress website’s posts and pages, without having to write code!
Wordfence Security: Anti-virus, Firewall and Malware Scan.
wpDataTables: This adds interactive tables easily from any input source.
Yoast SEO: The all-in-one SEO solution for WordPress, including on-page content analysis, XML sitemaps and much more.
All the above mentioned plugins, any new plugins, wordpress core files and ‘Hello’ Elementor theme should be updated regularly. Failing to perform these updates may result in improper functioning of the website and poor performance and speed. Always, backup the site (files and database) in the local drive before performing any update. It is also advisable to have monthly backups of the website.
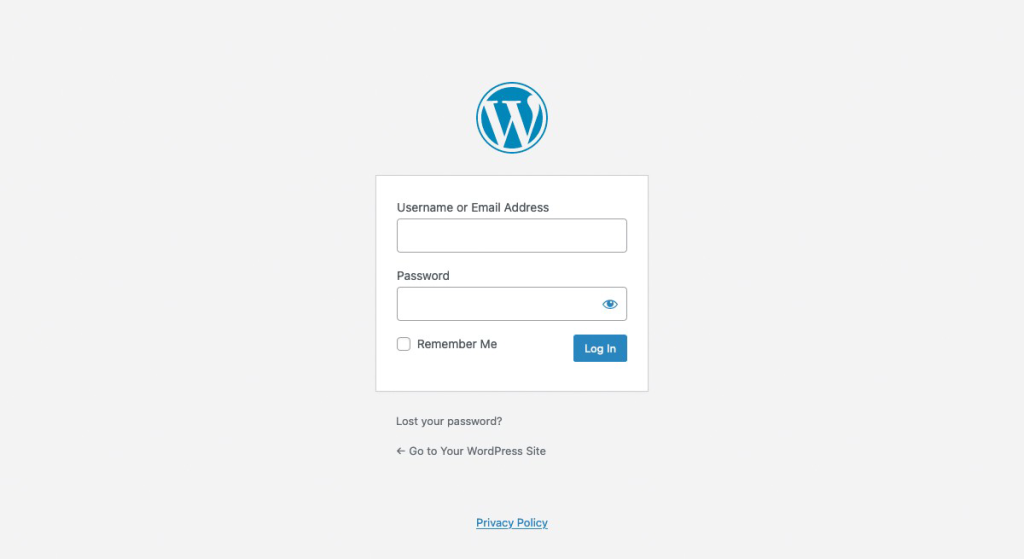
Before you can make any changes to your site, you will need to log in. The login for your site is typically found at the following URL – https://svecw.edu.in/wp-admin
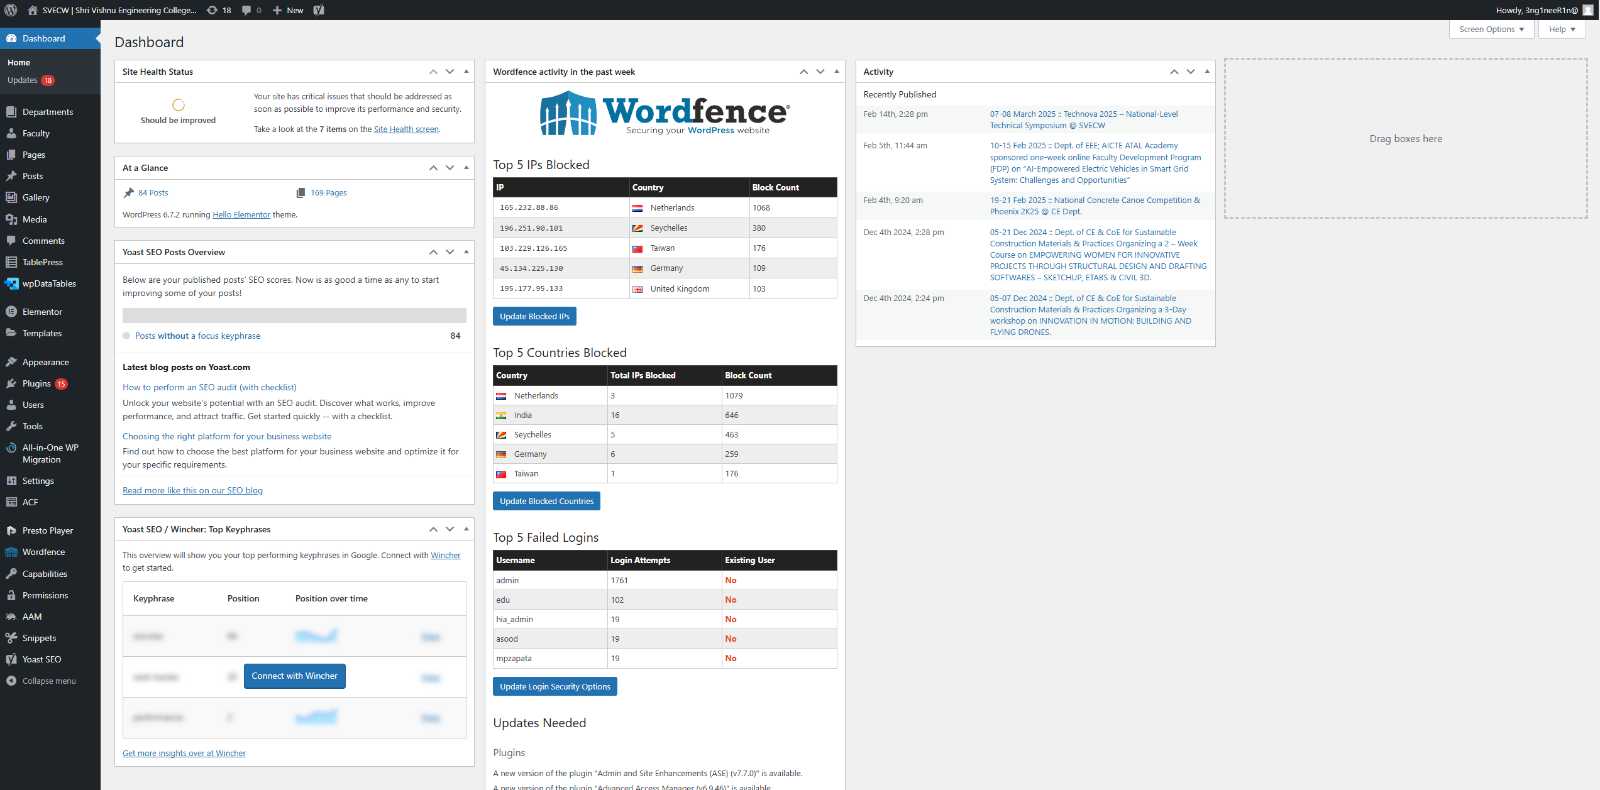
This will display your main Dashboard ‘homepage’. In the top left of your Dashboard, you’ll see some brief stats on the number of Posts, Pages, Categories and Tags contained within your site as well as ‘Wordfence’ activity and recently published posts on the right side.
Departments
- This is where all the department pages are placed, categorized according to their respective departments.
Faculty
- This is where all the faculty pages are placed, categorized according to their respective departments.
Posts
- This is where you can create a new Event Post. You can also update your Categories and Post Tags.
- This is where you create, edit and organize all the events that are listed under ‘Happenings at SVECW & Accreditations & Awards’.
- You can also update your Categories and Post Tags.
Media
- This is where all your uploaded images, documents or files are stored. You can browse through your Media library, as well as edit and update the files.
Pages
- This is where you create and maintain all your other Pages including Home Page, excluding department and faculty pages.
Gallery
- Gallery section contains all the data of the photos of the events updated in ‘Gallery’ page under News & Awards. This is driven by Google Photos.
Comments
- You can manage all your Comments within this section, including replying to comments or marking them as spam. Comments is disabled in this website.
TablePress
- This is where the consolidated placement tables are added, edited and deleted.
wpDataTables
- This is where you can manage year-wise placement data tables, edit them, add new and organize them.
Elementor
- This is the ‘Elementor’ settings section, where various functionalities of elementor plugin can be accssed. Some of the often used are settings, tools and custom code sections.
Templates
- This is where you can access all the templates of the pages, events, faculties, departments and popups.
Appearance
- This menu is where you control how your site looks. Themes, Menus and Theme Files are placed here but for managing the site, you won’t be accessing this section often.
Plugins
- Plugins extend and expand the functionality of WordPress. You can add or delete plugins within here as well as activate or deactivate them.
Users
- This screen lists all the existing users for your site. Only administrators can add or edit the users.
Tools
- This section gives you access to various convenient tools such as options to import and export data to/from your WordPress site. You can also run a Site Health check, which shows critical information about your WordPress configuration and any items that may require your attention.
Settings
- This is where your site is configured. Among other things, it allows you to configure your site name and URL, where your Posts appear, whether people can leave Post Comments or not and numerous other settings. Most times, once your site is setup, there’s no need to change any of the settings within this section.
At the bottom of the menu, you’ll see a link called Collapse menu. Clicking this will hide the menu and simply display their icons instead. Click the small arrow icon again to expand the menu.
Occasionally when you install a plugin, they will have their own configuration or setup pages. The location of these will be entirely dependent on the individual plugin but most times these pages will either appear within the Tools section, the Settings section or in a completely new menu section somewhere within the menu.
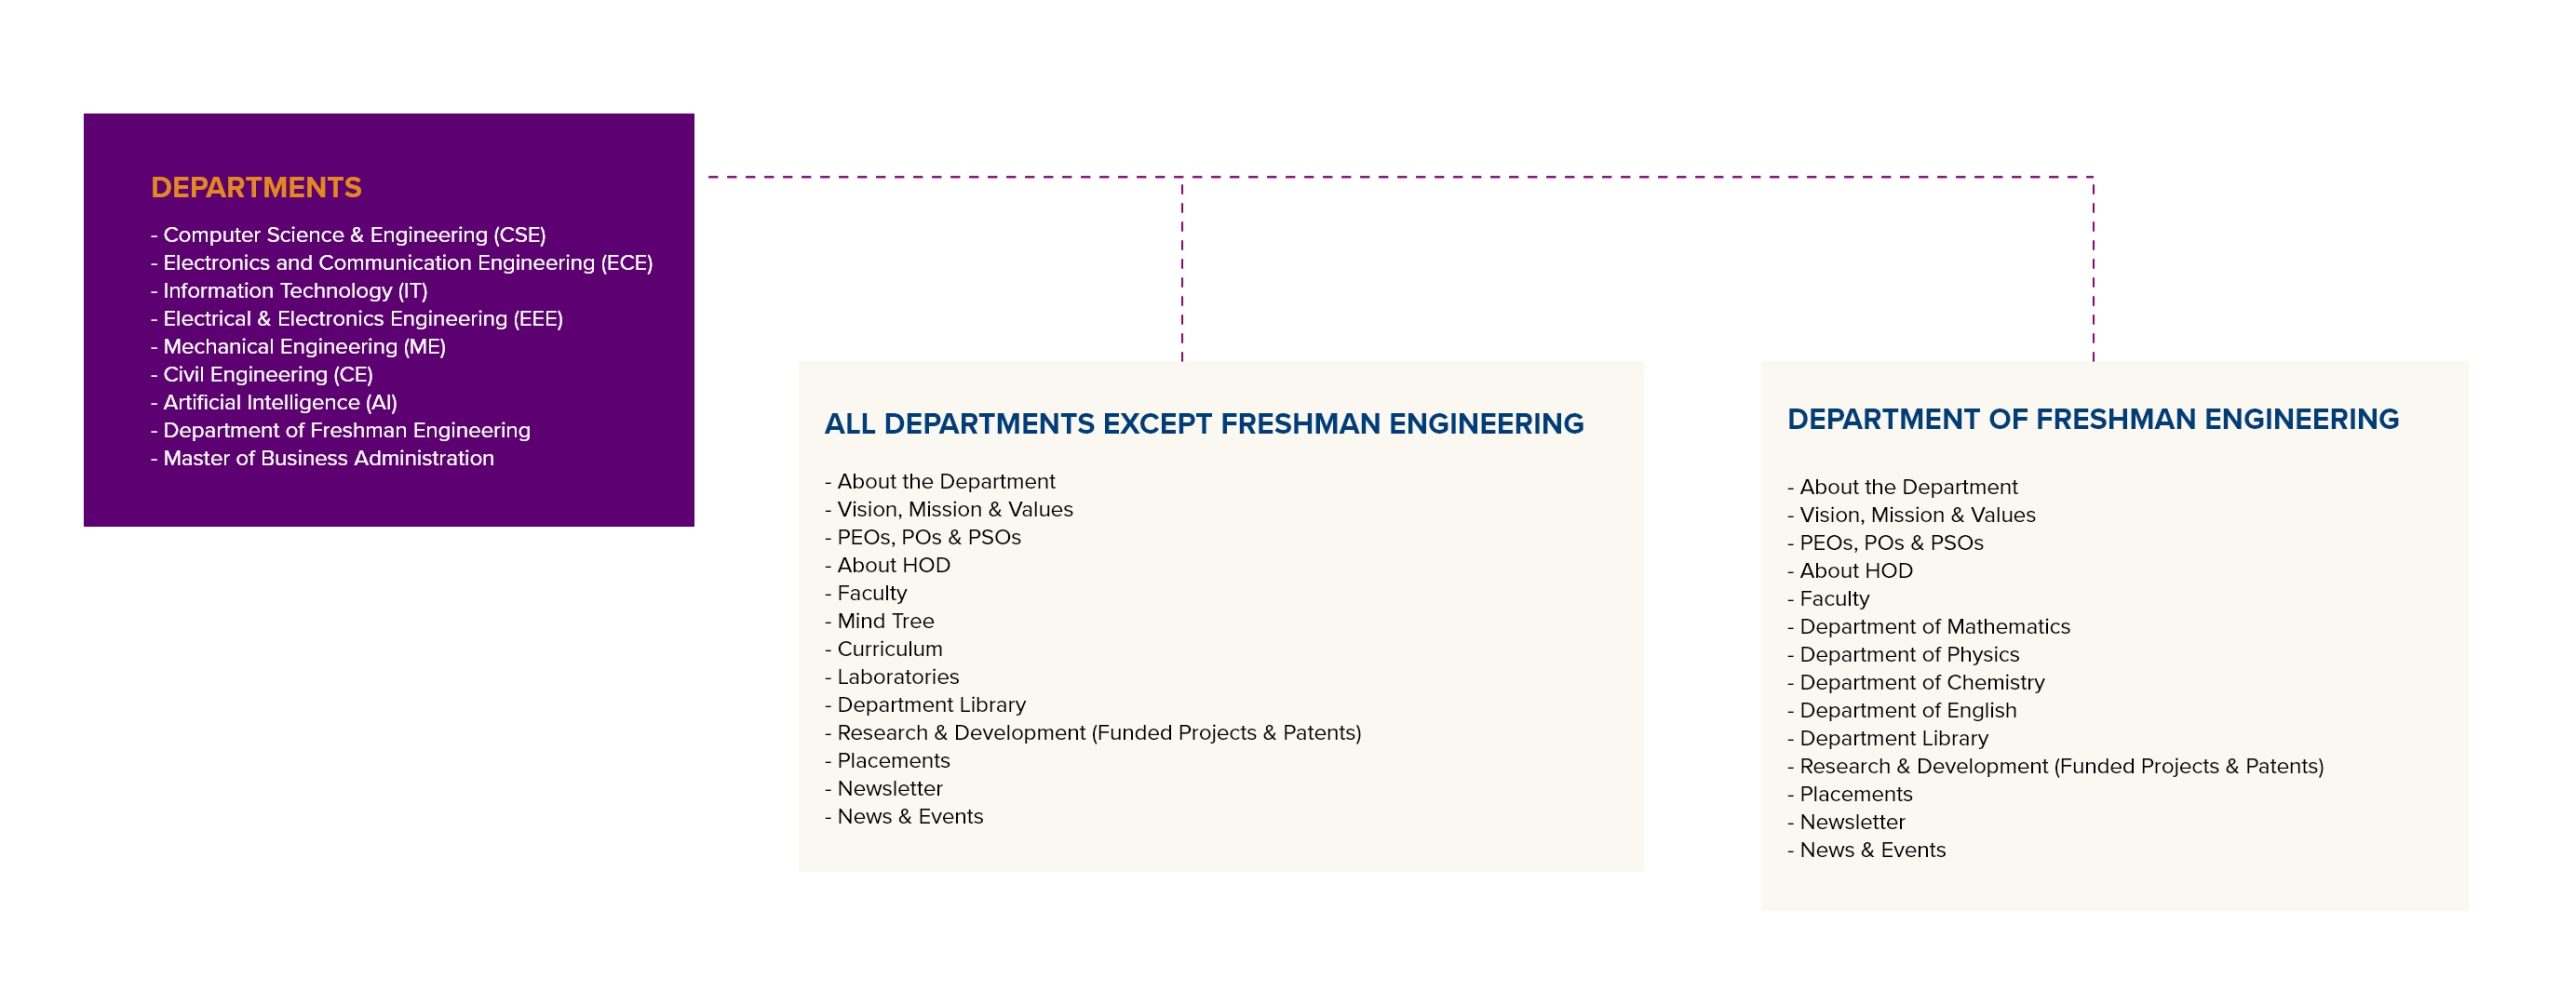
This is where all the department pages are placed, categorized according to their respective departments.
Refer for all the pages under respective departments:
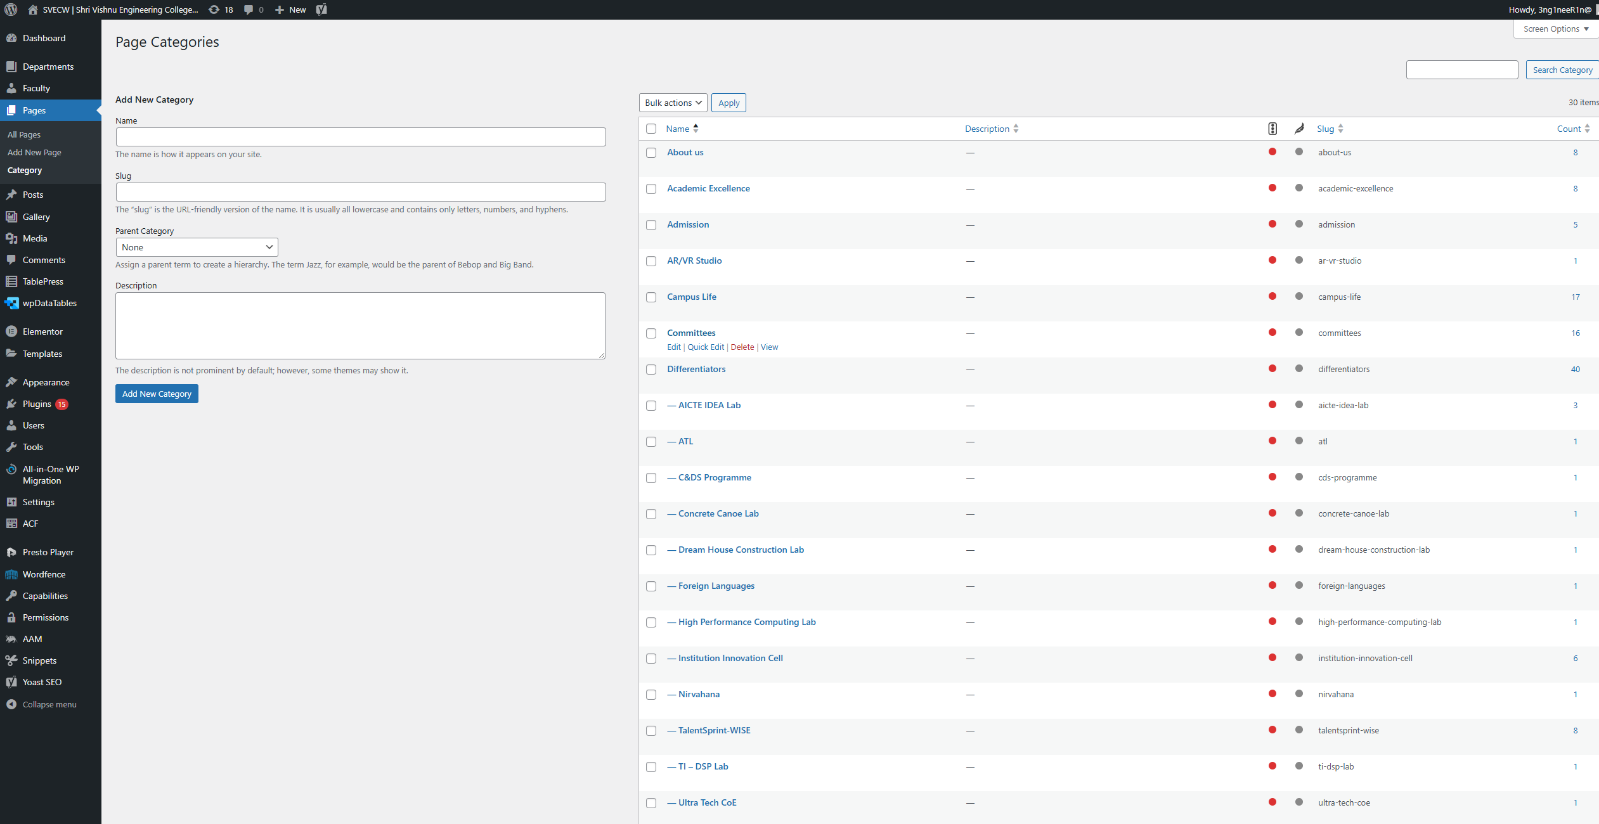
Add new page
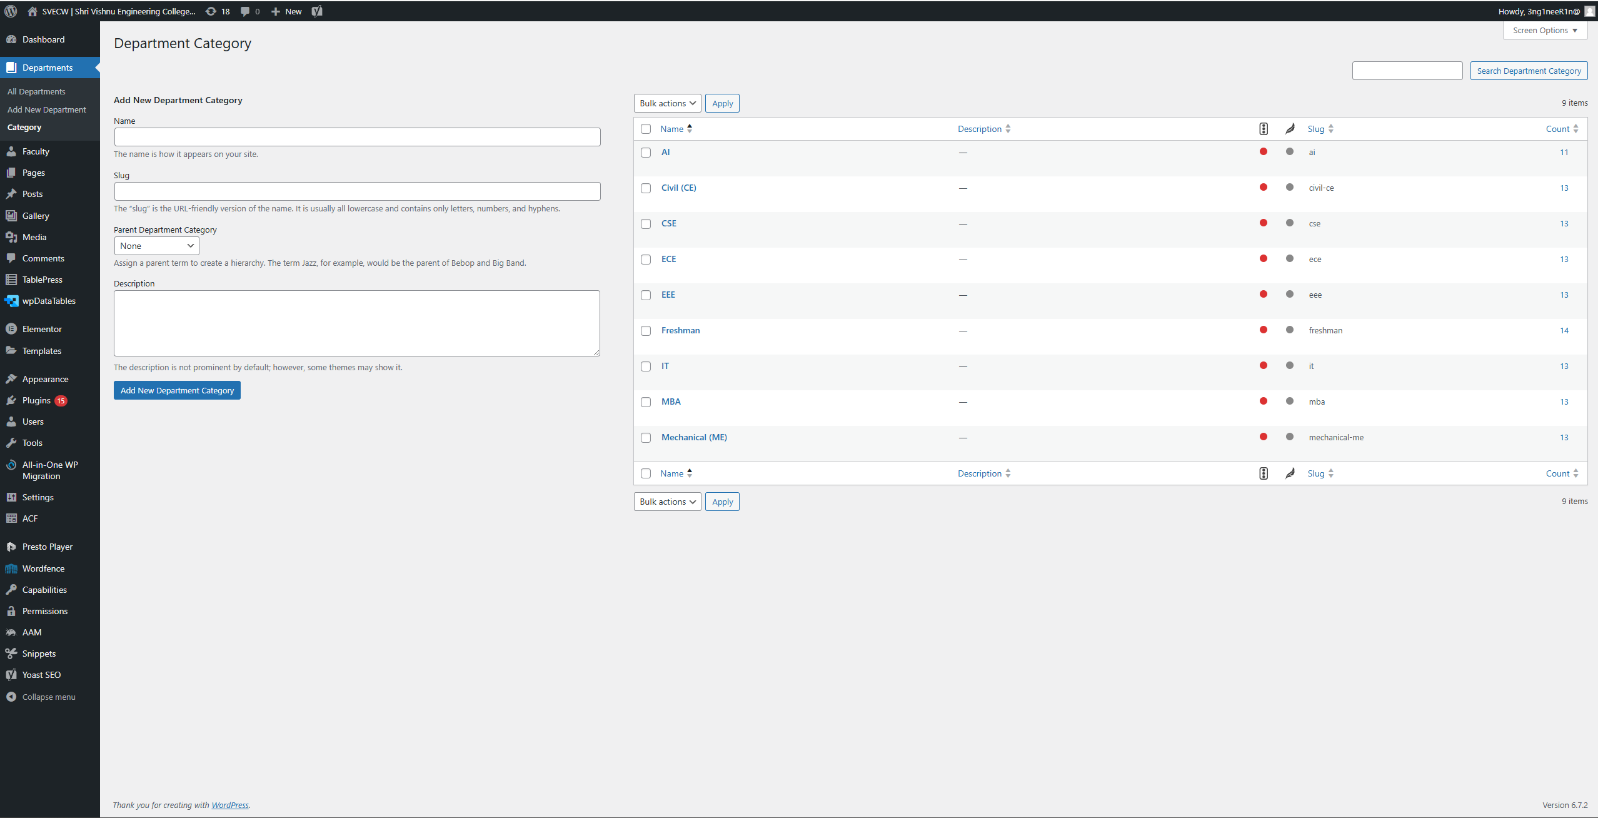
- Go to Category under Departments, and click the count number on the respective department. This will open a new window with all the pages under the selected department.
Duplicate the page with the page names with prefix of dash (—-). These pages are child-pages of the parent page, which is the department’s main page.
Now, navigate to ‘drafts’ section where you will find the duplicated copy of the page. Click to edit it.
All the settings are duplicated and use ‘Edit with Elementor’ option to add the new contents. Publish.
Edit existing page
Use the same process for editing the existing page. But click ‘edit with elementor’ instead of ‘duplicate’ option.
Edit the contents and publish.
Faculty pages are very similar to ‘Department’ pages. Use the same steps to add new faculty and edit existing faculty.
The page named ‘Faculty (Department Abbreviation) ie., Faculty (IT) is the landing page where all the faculty profiles are listed.
The page named with the respective faculty name is the individual person’s profile page.
Title, Department Category, Parent Page, Featured Image to be updated in the WordPress edit page.
Rest of the content like qualifications, achievements and accolades and all other content to be updated in Elementor Edit page.
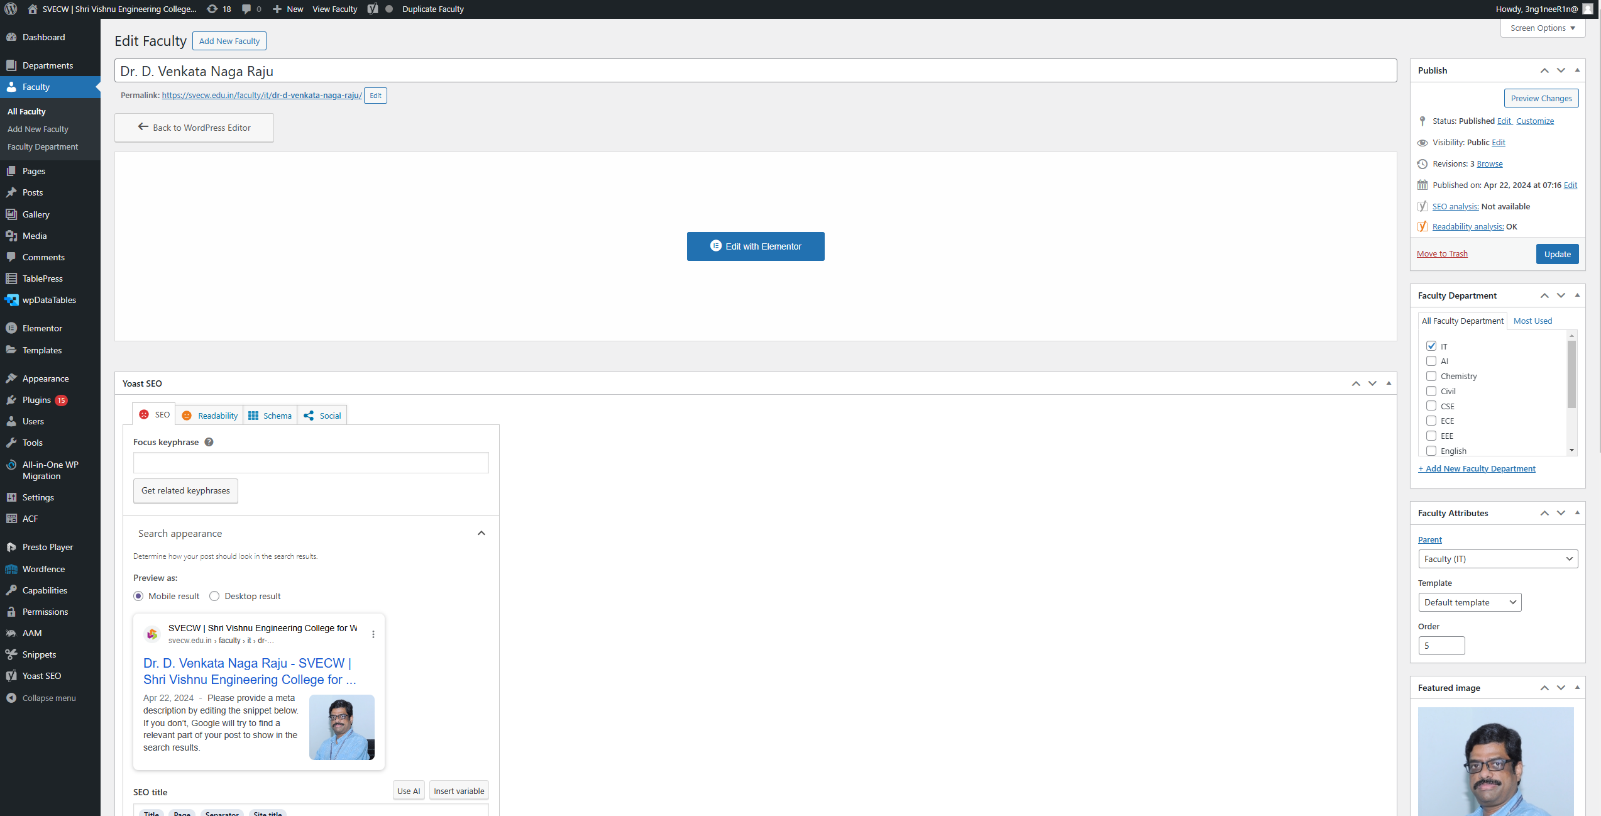
To change the order of the faculty list as how it appears in the front page, in the faculty list page, when you see mouse curser as a cross, just hold the faculty and drag to the place as per the order desired. See the video below.
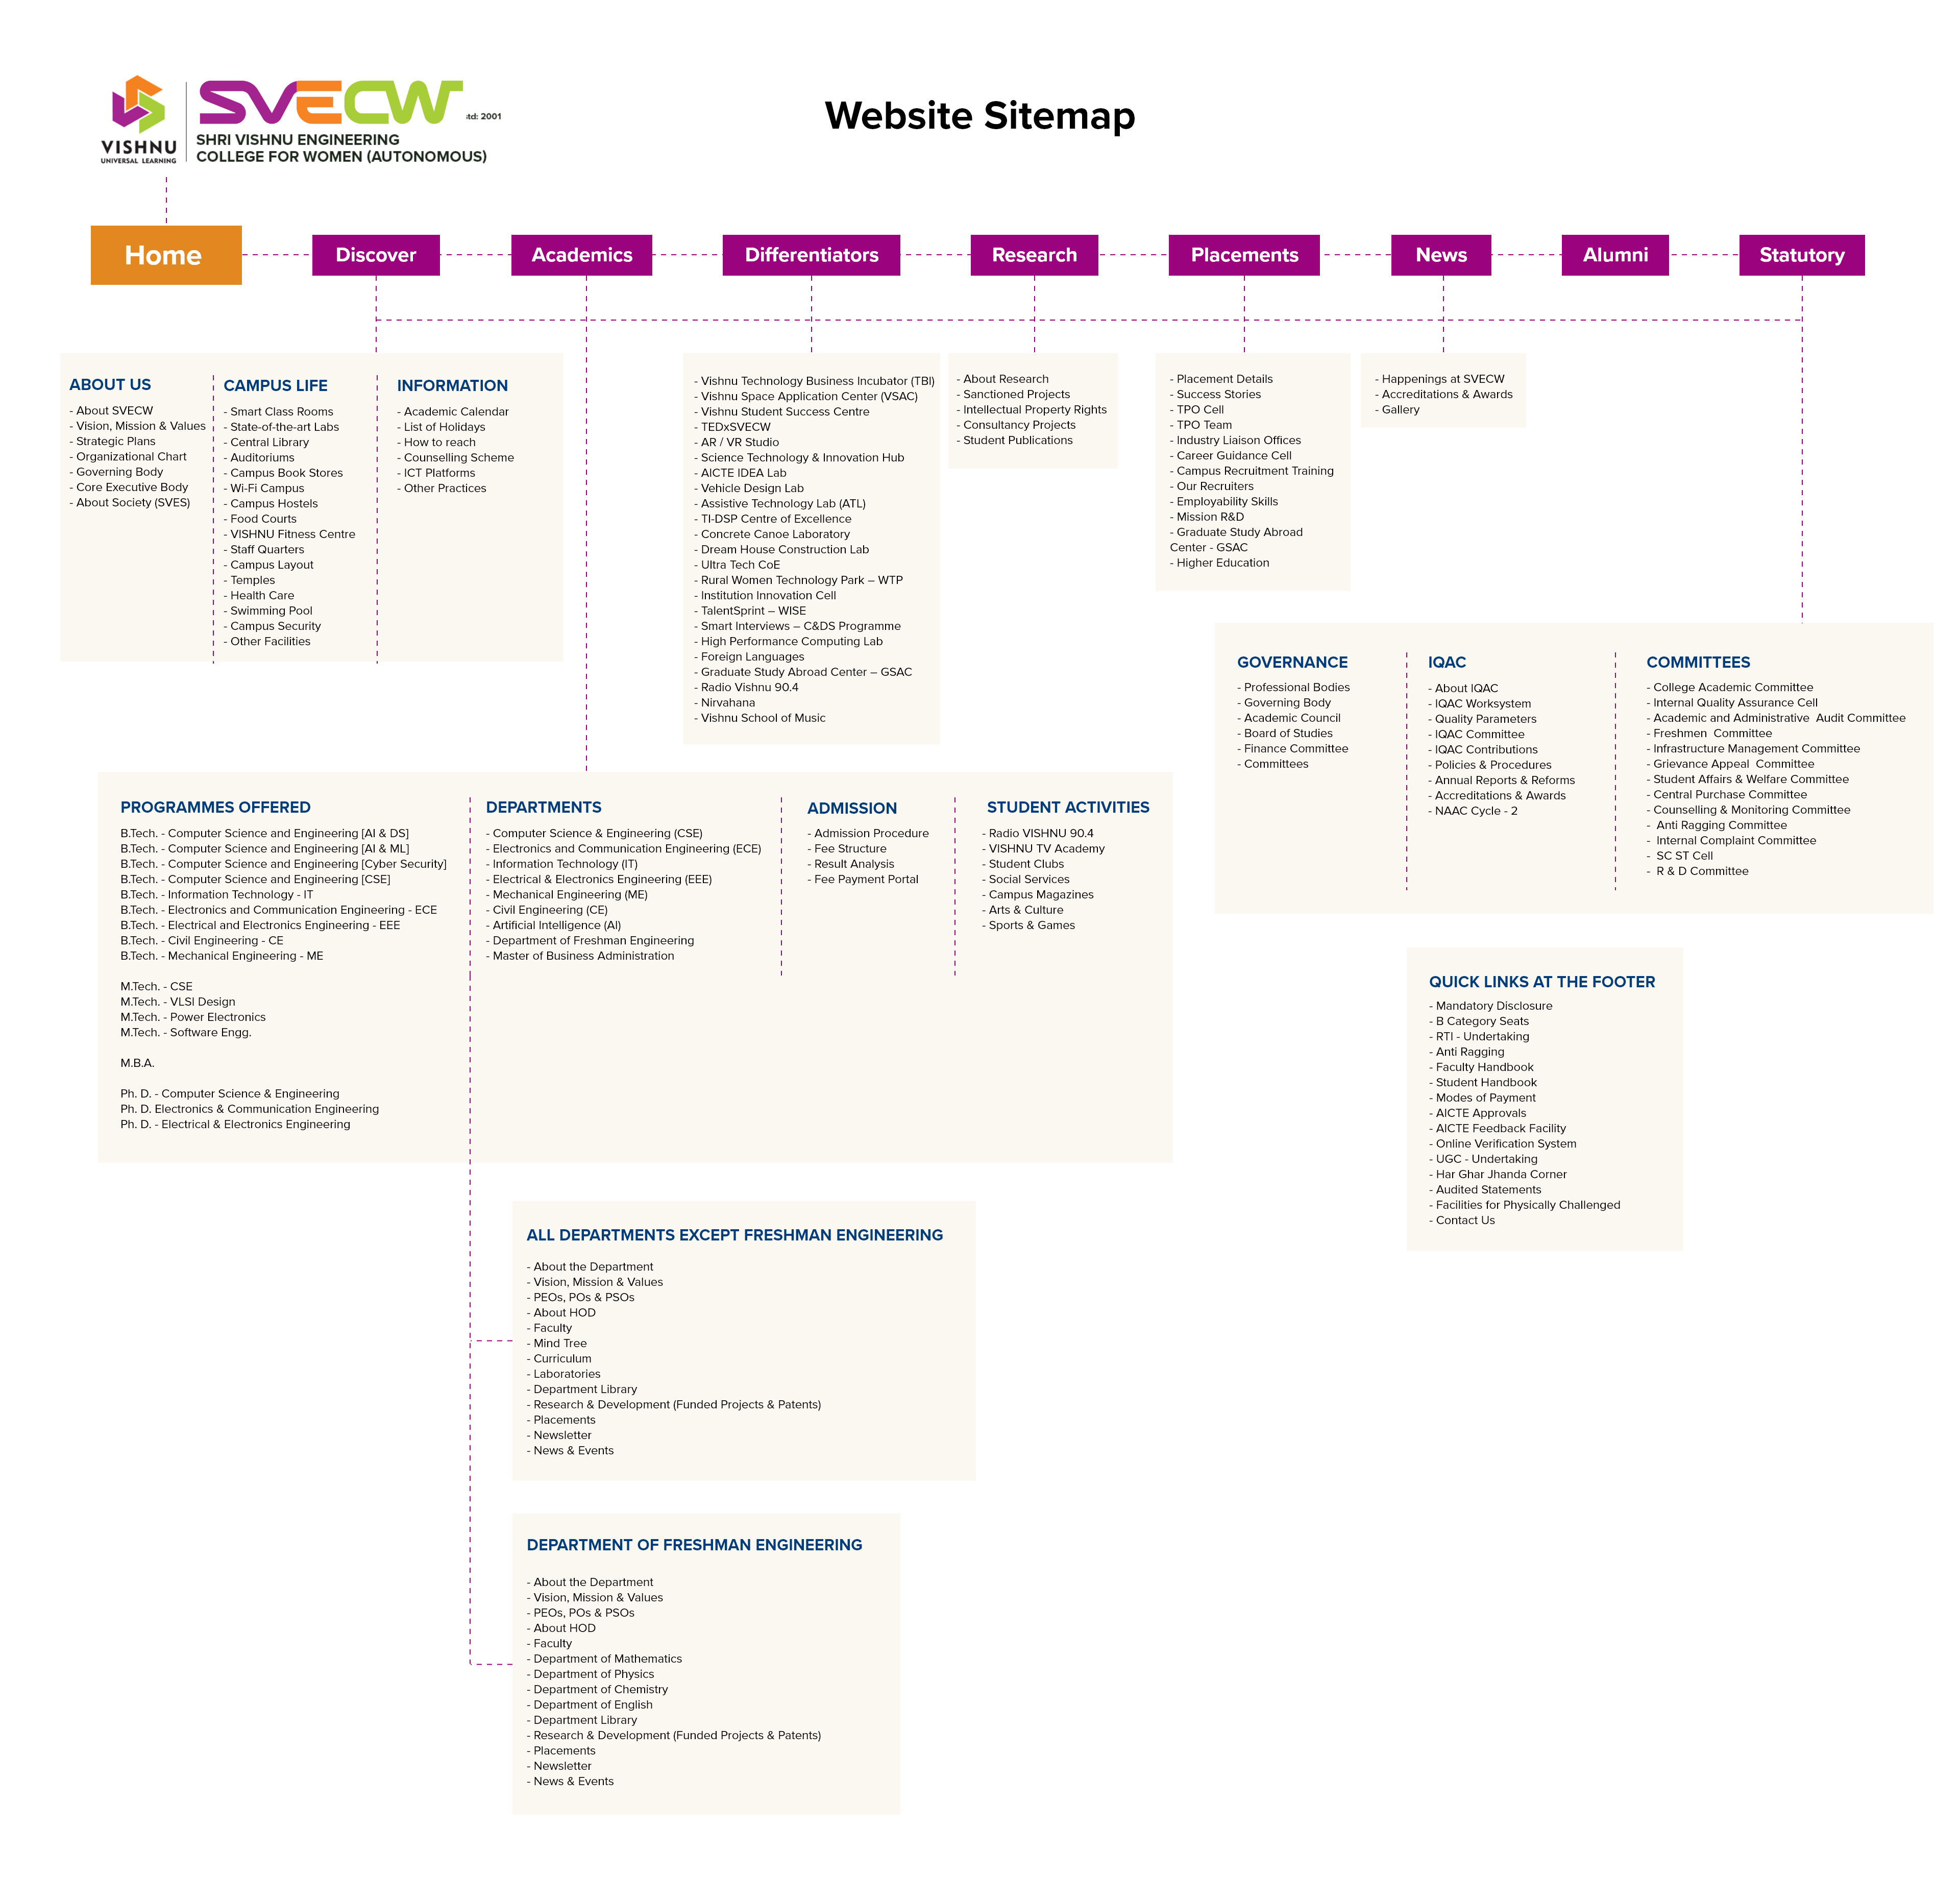
All the pages excluding the pages under departments are organized in this section. A detailed sitemap is presented below.
Add / Edit Page
Follow the same steps of adding and editing department pages for these pages as well.
- All of these pages are categorized under their respective headings. All the page names with prefix of a dash (—) are child pages and it should be referred with the correct Parent page, to display it correctly in the front end.
- Author names correlate to the access the webmasters will have to those specific pages. For Eg., Accreditations & Awards has author name as W3bmaster@Events so this user role will have access to this page and the other Webmasters will not be able to access the same.
Posts are used to add the events with the below mentioned categories and tags to organized them accordingly.
Categories:
- Awards (Corresponding Page – Accreditations & Awards).
- Happenings (Corresponding Page – Happenings at SVECW).
As the name suggests, all the award and accolades related posts will have category as ‘Awards’ and all the college events and happenings will have the category as ‘Happenings’.
Tags:
Additionally, there are six tags for the events.
- Accreditations: Awards and accreditations.
- Approvals: Approvals related posts.
- Rankings: Rankings related posts.
- Featured-home: This tag is updated for the post which should appear in the bigger section on the left side of the events section in the Home Page.
- Flash-news: This tag is updated for the scrolling news at the top of the header in all the pages.
- Recent-events: Completed events are given this tag so that it is moved to ‘Recent Events’ tab in the ‘Happenings at SVECW’ page.All the other events are listed in ‘Upcoming Events’ tab in the Happenings at SVECW page.
Add / Edit Post:
- Go to Posts and click ‘Add New Post’. Add title, choose the category (Happenings or Awards) and tags if applicable, as explained in the previous page.
Add a featured image that is resized, and converted to webp format.
- Click Publish to publish immediately or Save Draft to publish later.
To add the contents and then publish, click on Save Draft and then click ‘Edit with Elementor’.

To skip the above 4 steps, Go to Posts and then ‘Duplicate’ any of the existing event post. Change the title and Save as Draft.
Then Edit with Elementor and make the necessary changes and then hit ‘Publish’ at the top right corner.
New gallery post
To add a new gallery post, upload the photos of an event to Google Photos as an album.
Visit this url – https://photos.google.com/albums, after logging into the Google account.
- Click ‘create album’. In the next screen, Add the title in the below format.
‘19-21 Feb 2025:: National Concrete Canoe Competition & Phoenix 2K25 @ CE Dept.’
- Add photos by choosing from Google drive (google drive photos will show up) or ‘Select from Computer from the top right corner.
- Once the photos are added, the album should be open for public view. To do that, click three dots at the top right corner, and choose ‘Options’. Enable ‘Link Sharing’ option.

- Once the option is enabled, scroll down in the small dialog which is shown, copy the link.
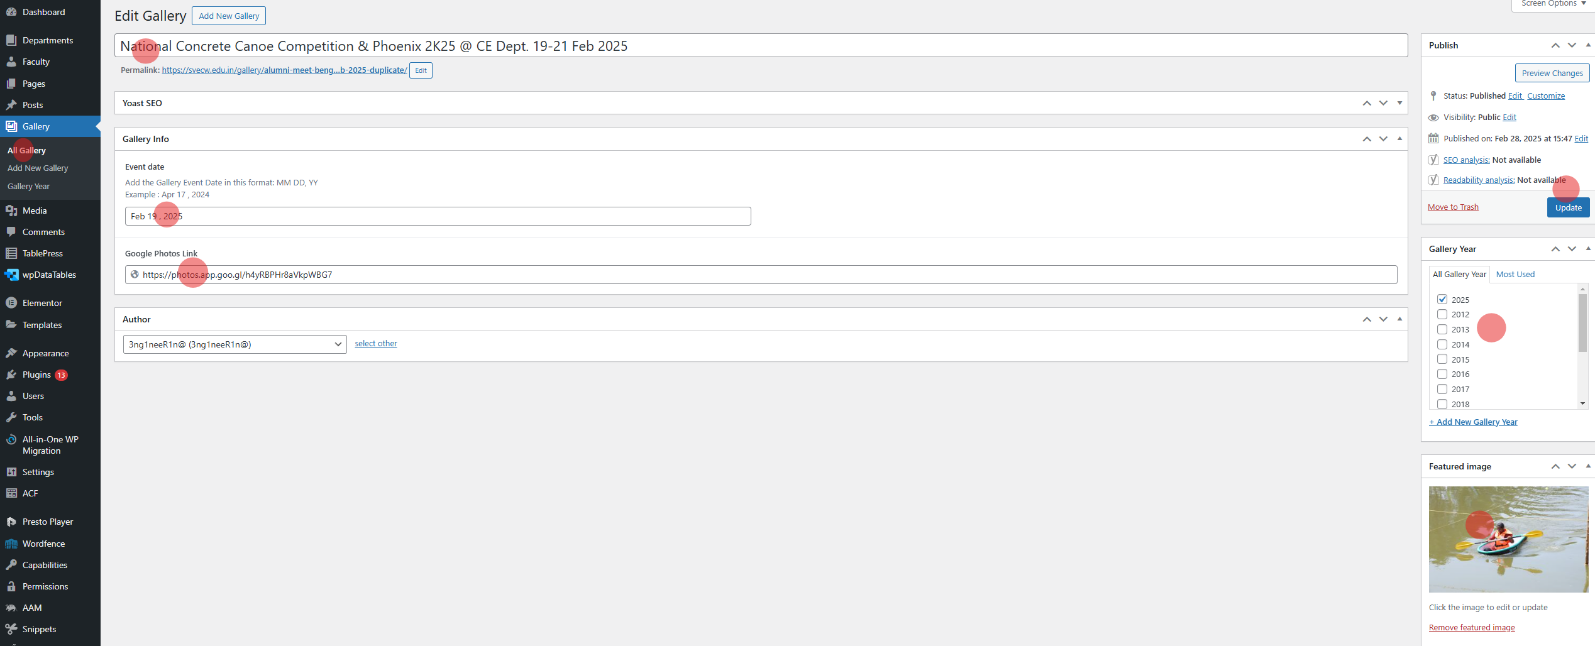
In the WordPress Admin, Go to gallery and follow the same steps as ‘Posts.
Duplicate an existing gallery, change the title (as used in Google Photos album).
Add event date, gallery link (copied from Google Photos), choose the year, add featured image and hit Publish.
New gallery year
- To add a new gallery year, say ‘2026′, go to Gallery Year and just add the number in the Name column and click ‘Add New Gallery Year’.
To add this new gallery year in the front page, go to Gallery page, and choose ‘Edit with Elementor’ on the top bar.
Once inside elementor editor, select the tabs, by clicking on its top right corner, where it will show a pencil icon.
Once selected, tabs panel will appear on the left side of the elementor editor.
Duplicate one of the tabs. Change the year.
Select ‘Loop Grid’ in the tabs section. Go to query and in the terms, type ‘2026’ and choose the newly created ‘Gallery-Year-2026’
This screen lists all the existing users for your site. Users with roles other than Administrator will see fewer options when they are logged in. Only administrators can add or edit the users.
At the top of the screen there are links that allow you to filter the list of Users based on the User Roles. The number in brackets will advise how many there are for that particular type.
In SVECW, the user roles are customized to suit the department-wise and other webmaster’s needs & requirements. It is described as below
- Administrator – has access to all the administration features
- Contributor – has editing and managing all the pages, posts, gallery, department pages, but cannot control the users.
- Editor – all the department webmasters are given editor role, and they can manage only their department pages.
- Author – Placements, research and events webmasters are given ‘author’ role and are limited to their pages or data only.
To edit your profile details, simply click on your user name, when viewing the list of Users or click on the Edit link that appears beneath your user name when hovering your cursor over each row. Alternatively, click on the Profile link in the left-hand navigation.
The various Appearance menus allow you to change how your site looks and behaves. Since SVECW site has been setup for you by us, you won’t need to change any of the settings in here.
Themes: The overall appearance of a WordPress site is controlled by the Theme. SVECW website runs on ‘Hello Elementor’ theme and no need to change or manage this section. Only ‘update’ this theme whenever there is a prompt.
Delete any other themes that show up in this section, which may be installed by WordPress updates and not by the developer.
Patterns: The Patterns screen allows you to manage what patterns are available when editing your site. We don’t use patterns and no need to access or manage this section.
Customize: Using the Customizer, you can modify certain parts of your website. NO need to access this section.
SVECW is designed with different menus for different sections, as presented in the main menu of the website.
Updating the Menu
Adding a New Menu
- SVECW website uses multiple menu structures to manage and organize all the pages in a better manner.Most of these menus are located in the main menu and in the sidebar menu. Refer the list below:
About Us
Academic Excellence
Admission
AICTE LAB
Campus Life
Committees
Department > AI
Department > Civil (CE)
Department > CSE
Department > ECE
Department > EEE
Department > Freshman
Department > IT
Department > MBA
Department > ME
Departments (In Header)
Differentiators (In Header)
Differentiators (In Page Sidebar
Footer Quick Links
Governance
Header Quick Links
Information
Institution Innovation Cell
IQAC (Header)
News
Placements
Professional Bodies
Research
Student Activities
TalentSprint-WISE
Vehicle Design Lab
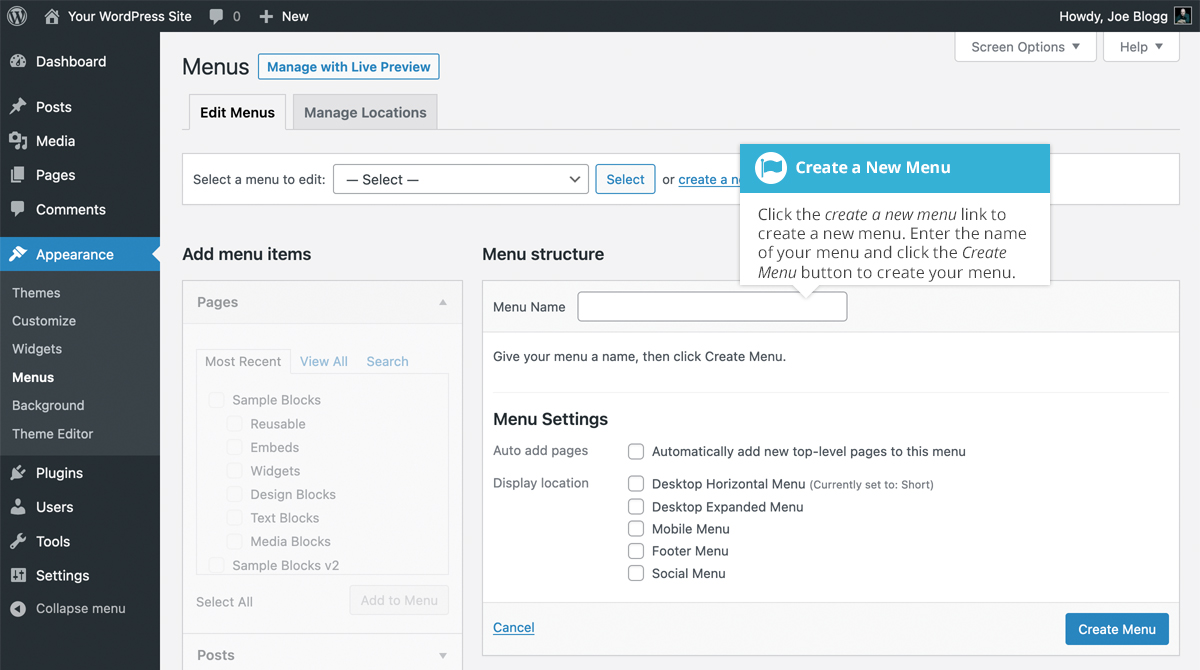
- To add a new menu, hover your cursor over the Appearance menu option in the left-hand navigation menu and in the fly-out menu, click the Menus link. Alternatively, click the Appearance menu option and then click the Menus link underneath.
- On the screen that’s displayed, click the create a new menu link. You’ll be presented with a screen similar to below. Enter a name for your new menu in the Menu Name input field. Click the Create Menu button to create your new menu.
Editing an Existing Menu Items
- Your current list of menu items resides in the right-hand column on the menu screen. Simply select the menu you would like to edit from the Select a menu to edit dropdown list and then click the Select button. The menu items for your selected menu will then be displayed.
- The items in this right-hand column on the Menus page will match the menu items that appear on your website. Clicking on the down arrow next to each menu item name will show an options panel for that particular menu item. In this options panel, there are several items that can be updated. You can show or hide extra fields such as Link Target, CSS Classes, Link Relationship (XFN) or Description using the Screen Options tab at the very top-right of the screen.
- URL – Only displayed for Custom Links and will contain the URL to navigate to when that menu item is clicked.
- Navigation Label – This is the label that will display within the actual menu on your website.
- Title Attribute – This is the tooltip that appears when the mouse cursor hovers over the menu item.
- Open link in a new window/tab – (Hidden by default) You can set the menu item to open in the same window or tab (which is the default) or in a new window or tab. This option is made visible by ticking the Link Target option on the Screen Options panel.
- CSS Classes – (Hidden by default) Optional CSS Classes to add to this menu item. This option is made visible by ticking the CSS Classes option on the Screen Options panel
- Link Relationship (XFN) – (Hidden by default) Allows for the generation of XFN attributes so you can show how you are related to the authors/owners of site to which you are linking. This option is made visible by ticking the Link Relationship (XFN) option on the Screen Options panel.
- Description – (Hidden by default) The description for the link. This may or may not appear, depending on the theme. This option is made visible by ticking the Description option on the Screen Options panel
- Each menu item can be moved to a new location in the menu hierarchy by using either the links underneath the Title Attribute input field or by clicking on the title area of the menu item and dragging ‘n dropping the menu to new location. If you choose to drag ‘n drop your menu items, the cursor will turn into a four-pointed arrow when you’re hovering over the correct area.
- After making updates to your menu items, click the Save Menu button.
Adding a New Menu Item
- By default, only the Pages, Custom Links and Categories panels are shown. If you’d like to add Posts, Tags or Post Formats as menu items, you simply use the Screen Options tab at the top-right of the screen to enable these panels as well.
- To add a new Page as a menu item, tick the checkboxes in the Pages panel, next to each of the Pages that you’d like to add. You can select one Page at a time or multiple. After selecting your Pages, click the Add to Menu button. The new menu items will append to the bottom of the current list of menu items. The menu item name will default to the Page name. To change this, simply click on the down arrow next to the menu item name to view the options panel and then update the Navigation Label to your preferred name. After making your updates, click the Save Menu button at the top or bottom of the screen. The steps to add a Post, Post Format, Category or Tag as a menu item are exactly the same as adding a Page.
- To change the order that the menu options appear in, simply place your cursor over the title area of the menu item you’d like to move. When the cursor changes to a four-pointed arrow, click and drag the menu item to its new location. Depending on how your menu is configured within your theme, it’s even possible to create the multi-level hierarchy required for dropdown menus. After moving your menu items around, don’t forget to click the Save Menu button to save your changes.
Adding a Custom Link Menu Item
- Use the Custom Links panel to add a custom link to your menu, such as a link to an external website. Simply type in the website URL in the URL field and the menu name in the Link Text field. Click the Add to Menu button when done. Use the same steps outlined previously to adjust the order of the menu item and click the Save Menu button to save your changes.
Delete a Menu Item
- To delete a menu item click on the down arrow next to the menu item name to view the options panel for that item and then click the Remove link. After making your updates, click the Save Menu button.
Header: Access this template to edit logo, menu items, flash news scroll and contact numbers and social media icons, basically everything that appears in the header section of the webpages.
Footer: Access this template to edit the footer quick links, department links and campuses links and footer note.
Single Page: The templates of all the pages, events, faculty are placed in this section. The page template can be accessed to edit the common parts of the page like, page title, side bar menu, banner images etc.
Banner Images
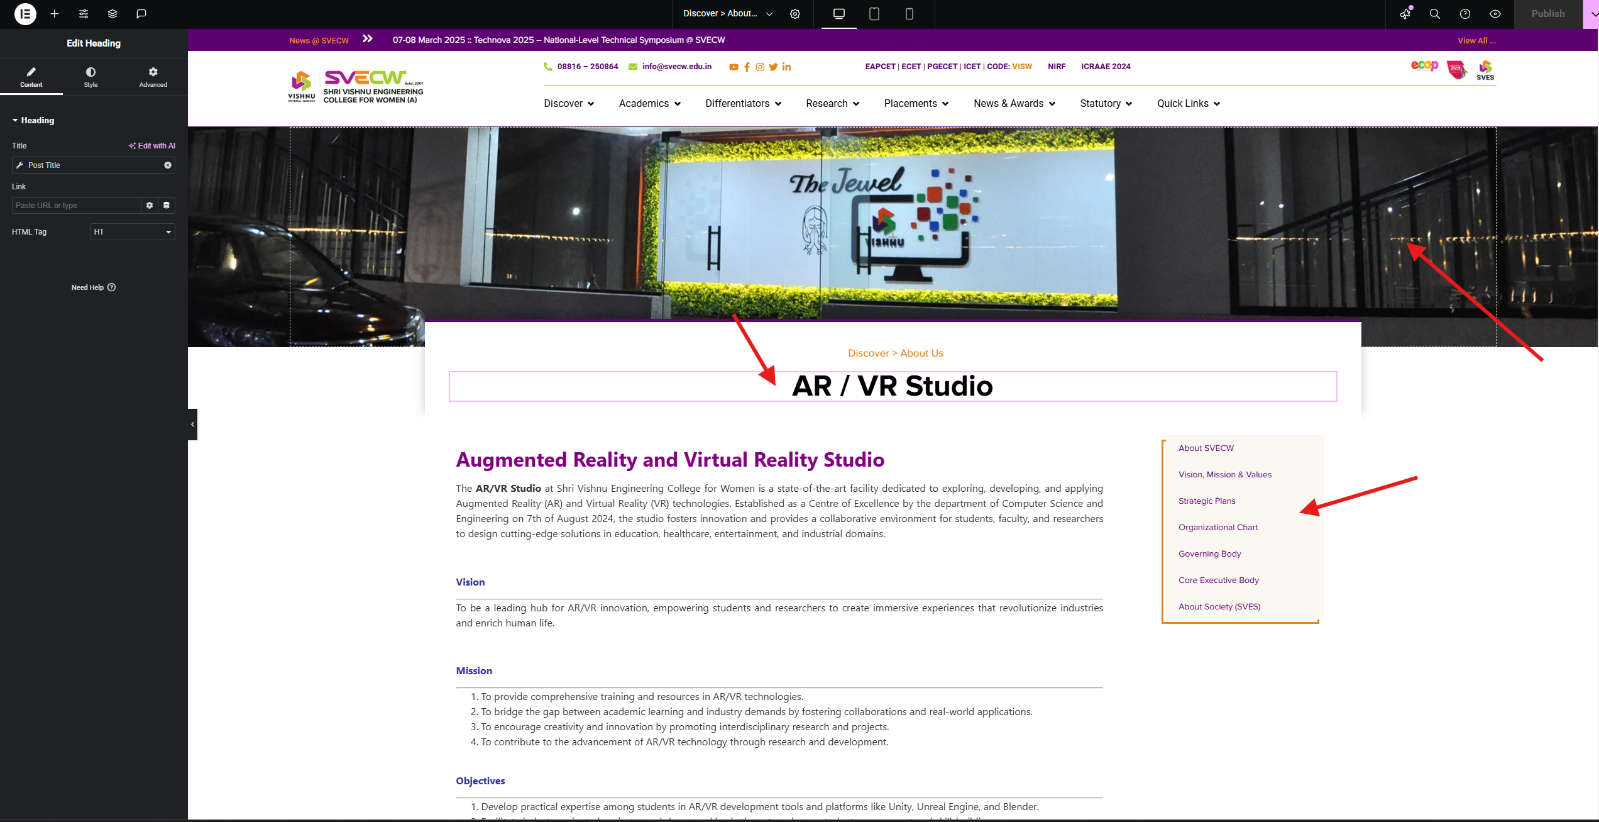
In Elementor Edit mode, Click layers panel on the top bar, as shown in the video. And choose ‘Hero’ in the layers panel.
Once Hero is selected, go to ‘Style’ in the left side edit panel, click the background images and add the desired images to the banner.
All the pages using this particular page template, will be updated with the new banner images.
Adding a new Page Template
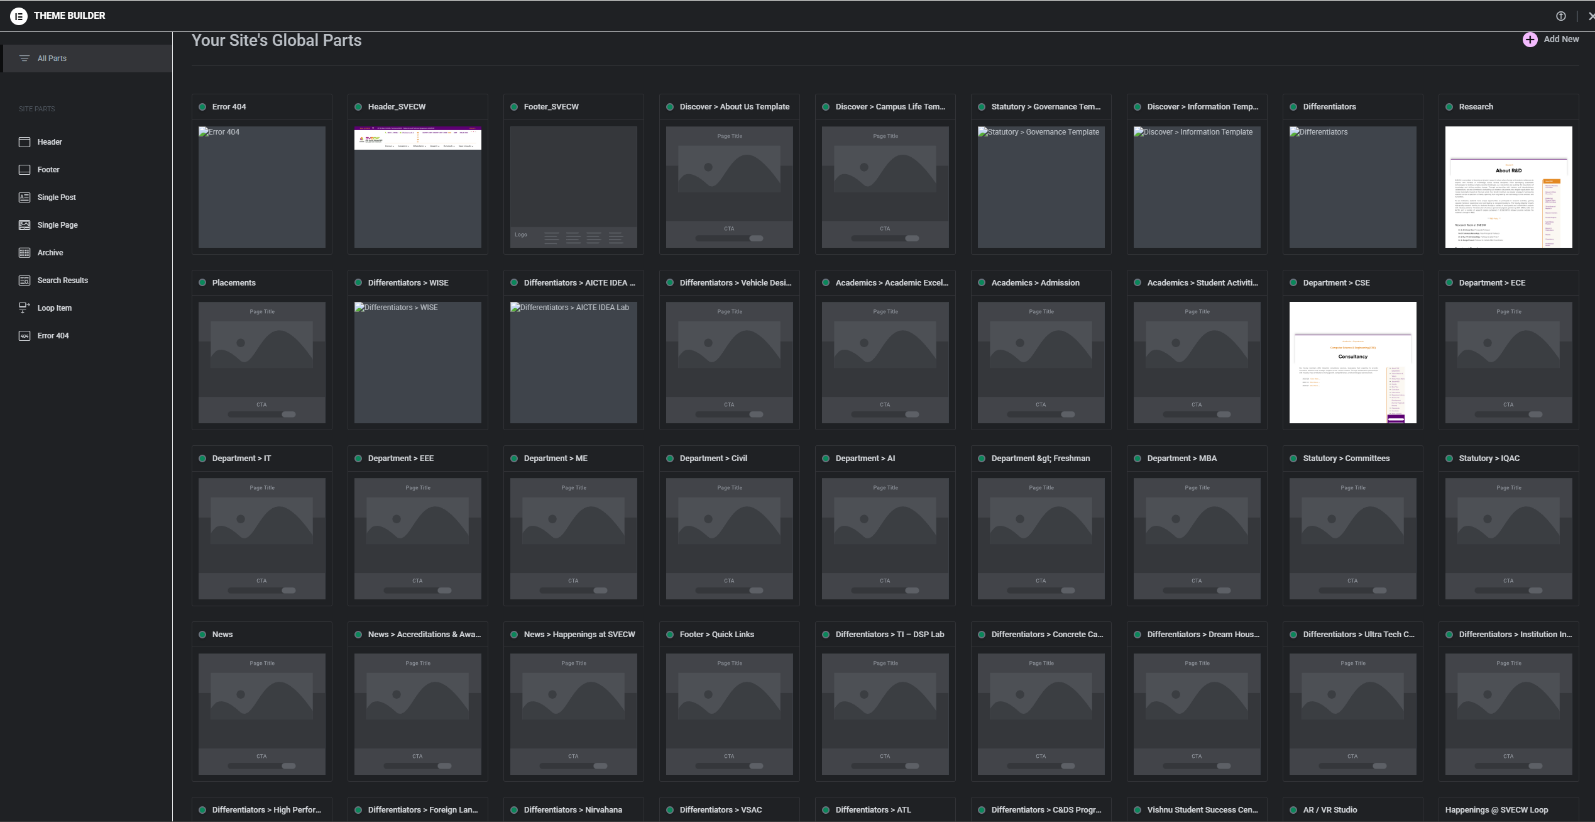
Go to Theme Builder, click, ‘Switch to table view’ at the bottom of the page.
Go to Single Page. Duplicate an existing page template.
Choose the duplicated page template, change the title and go to ‘Edit with Elementor’.
Banner images and menu can be updated from this mode. Change the banner as explained in the above step.
To update the menu. Select the menu at the side bar. In the left side panel, choose the desired menu from the drop down against ‘Menu’.
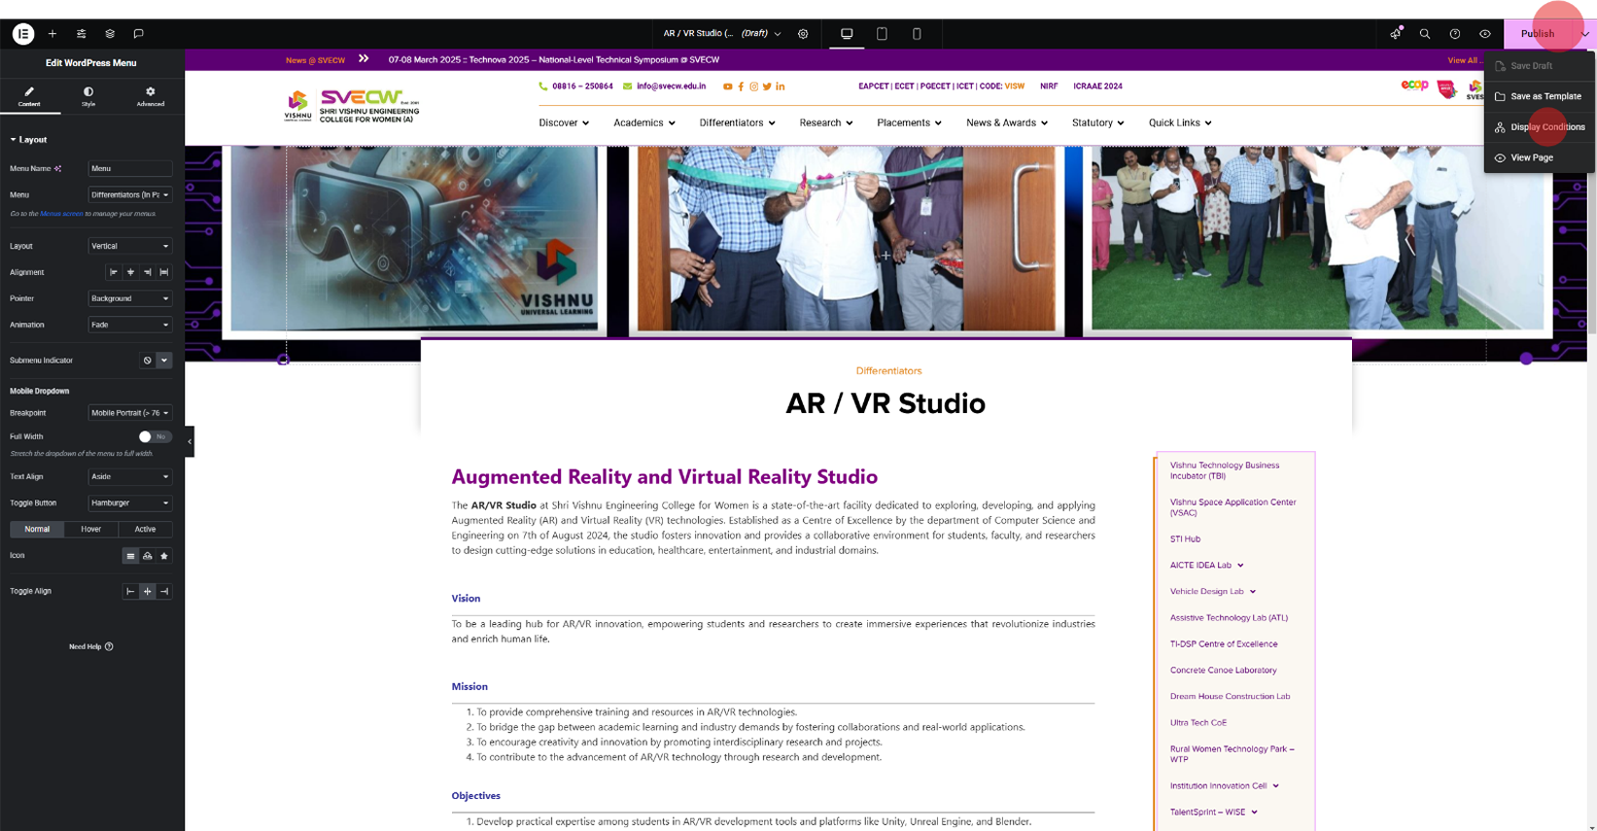
Once all the changes are done, under the drop down near ‘Publish’, choose ‘Display Conditions’ and choose the locations where this template to be displayed. And hit Publish.
New template will be applied in the pages as selected accordingly.
Editing page contents in elementor
Use ‘Edit with Elementor’ at the top of the page and change the contents as desired.
The style guide of all the elements used in the website is given in this page, right after this help guide.
You can copy the widget and paste in any page and edit and add the contents as desired.
All the settings and styling will be copied and applied. No need to change anything except the contents. But, still feel free to explore the options provided by Elementor but ensure you don’t change the look and feel of the website.
To begin, go to Templates > Popups. Control the layout, conditions, rules and styles of the popup, and then design the popup content.
- To add a new popup, go to Templates >Popups, duplicate any of the existing pop ups. Edit with elementor and add the new content and images.
- When you hit Publish, a new popup modal with open, where you can define the location, frequency and triggers to have complete control over the popups.
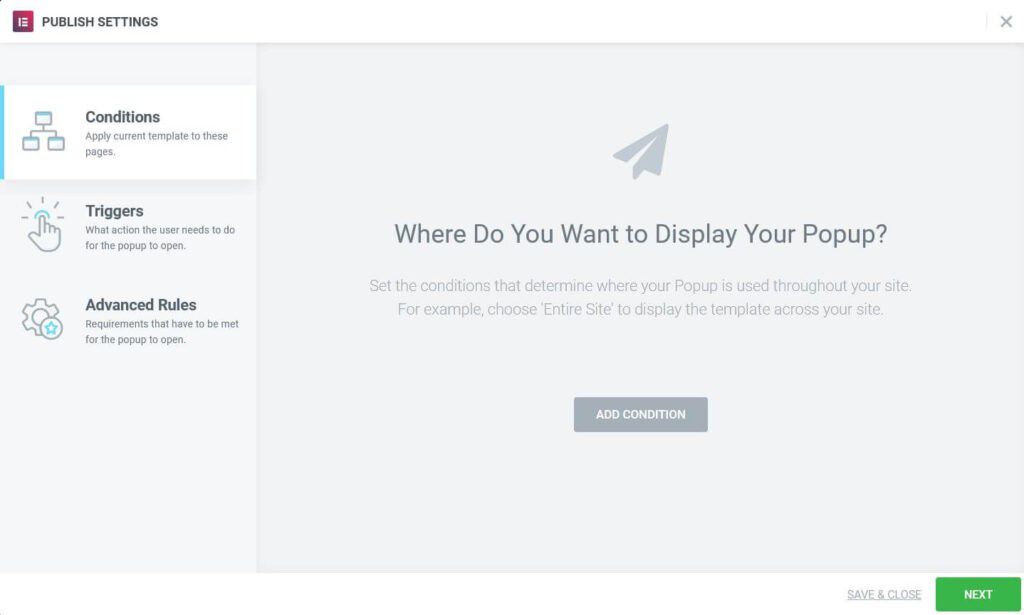
1.Conditions allow you to set on which pages of your website the popup will appear. For example, add an Include condition and choose Singular > Front Page to only show the popup on the site’s home page.
2.Triggers are the user actions that cause your design to popup. Select Yes or No for each option that will cause the popup to occur.
3.Advanced Rules specify other requirements that must be met to generate a popup.
Please refer ‘Elementor’ guide for complete knowledge of popups in this link.
Please refer the videos below to edit the contents and data of the placement tables.
Introduction -Placements Table
Updating Table - 2024 Placement Students List Part 1
Updating Table - 2024 Placement Students List Part 2
Updating Table - Company Wise Placements
Website Style Guide
COLOR PALETTE
Primary Purple
#5C0072
Sec Orange
#E38821
Accent Green
#A7CD39
Grey 3
#F5F5F5
Grey 4
#FBF8F2
Black
#000000
Typography & Components
H2 heading simple
H3 heading simple
H4 heading simple
H2 heading theme
H3 heading theme
H4 Light heading
H4 Light heading
Shri Vishnu Engineering College For Women is located in Bhimavaram – the central part of Coastal Andhra. The area generally known for its commercial activities has recently established itself as a Center for Academics.
The campus is located in Vishnupur which is 3 km from Bhimavaram on Tadepalligudem Road.
- Haptic Hat
- Android Application for Icon recognition
- Fall Detector for Elderly
Accordion 1
The greatest essayist of England Francis Bacon believed that books are the best companions in a student’s life and quoted aptly about the significance of books:
“Some books should be tasted, some devoured, but only a few should be chewed and digested thoroughly.”
With all the right ambiance, the addition of a well-known book shop ‘Higginbotham” creates even better environment for all the students here. The shop is situated very close to the temple complex and is accessible to students.
Accordion 2
The greatest essayist of England Francis Bacon believed that books are the best companions in a student’s life and quoted aptly about the significance of books:
“Some books should be tasted, some devoured, but only a few should be chewed and digested thoroughly.”
With all the right ambiance, the addition of a well-known book shop ‘Higginbotham” creates even better environment for all the students here. The shop is situated very close to the temple complex and is accessible to students.
Accordion 3
The greatest essayist of England Francis Bacon believed that books are the best companions in a student’s life and quoted aptly about the significance of books:
“Some books should be tasted, some devoured, but only a few should be chewed and digested thoroughly.”
With all the right ambiance, the addition of a well-known book shop ‘Higginbotham” creates even better environment for all the students here. The shop is situated very close to the temple complex and is accessible to students.
Vishnu Stores is strategically located in the first floor of the temple square in the campus. Opening hours are from 8a.m. to 10p.m. every day. The featuring a variety of products often sold with Vishnu Logo are stickers, bags, key chains, pens, notebooks, coffee mugs, caps, trousers, shirts, t-shirts, blazers, ties, handmade collections, wrist watches, time pieces, eco bottles, stationeries etc.
There is a collection of wide range traditional confectionary to a superior selection of gift articles and greeting cards. The special gift packages are also arranged according to student selection and budget.
Appearance > Customize > Custom Css : Backup
html {
scroll-behavior: smooth;
}
/*Text aligned to be justified*/
p
{
text-align: justify;
}
/* Global Links color */
body a
{
color: #E38821;
}
/* Button custom styling */
.elementor-widget-button
{
z-index: 0 !important;
align-self: start !important;
}
.elementor-button:before {
border: 3px solid #5C0072;
content: “”;
display: block;
height: 100%;
position: absolute;
width: 100%;
top: 6px;
left: -5px;
z-index: -1;
}
.elementor-button:hover {
background-color: #5C0072;
}
/* Bullet points custom styling */
.bullet ul
{
list-style-type: none;
padding-left: 0px;
}
.bullet li
{
position: relative;
padding-left: 30px;
margin-bottom: 10px;
}
.bullet li:before
{
content: url(‘https://svecw.edu.in/wp-content/uploads/2024/03/copy-icon-2.svg’);
position: absolute;
left: 0;
margin-right: 10px;
}
/* Table in text editor */
#tabl
{
overflow-x: auto;
overflow-y: hidden;
}
/* Default table css in text editor */
table td{
border: 0;
}
table thead{
background-color: #e38821;
color: white;
line-height: 1;
}
tbody tr:nth-child(odd)
{
background-color: #FBF8F238;
}
tbody tr:nth-child(even)
{
background-color: #fcf1da;
}

Home Banner Image Dimentions:
- Size:1920px x 850px, 96 DPI, WEBP format
Inner Page Banner Image Dimensions
- Size: 2560px x 450px, 96 DPI, WEBP format | Content width: 1500 x 300 | Margin-top: 50px | Margin-bottom: 100px
Table
| B.Tech. | Intake |
| Computer Science & Engineering [Cyber Security] | 60 |
| Computer Science & Engineering | 180 |
Faculty Profile

Designation